The Royal Bake Mastering Authentic Chhena Poda

The Royal Bake: Mastering Authentic Chhena Poda – Odisha’s Signature Dessert

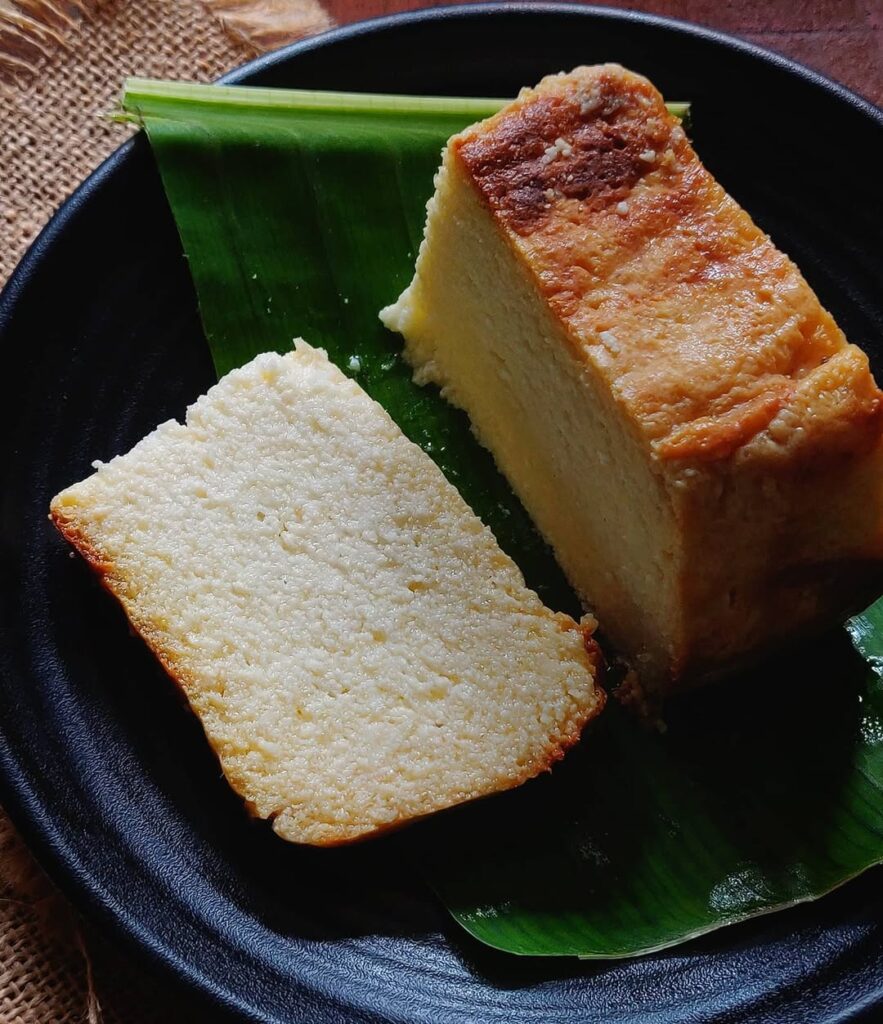
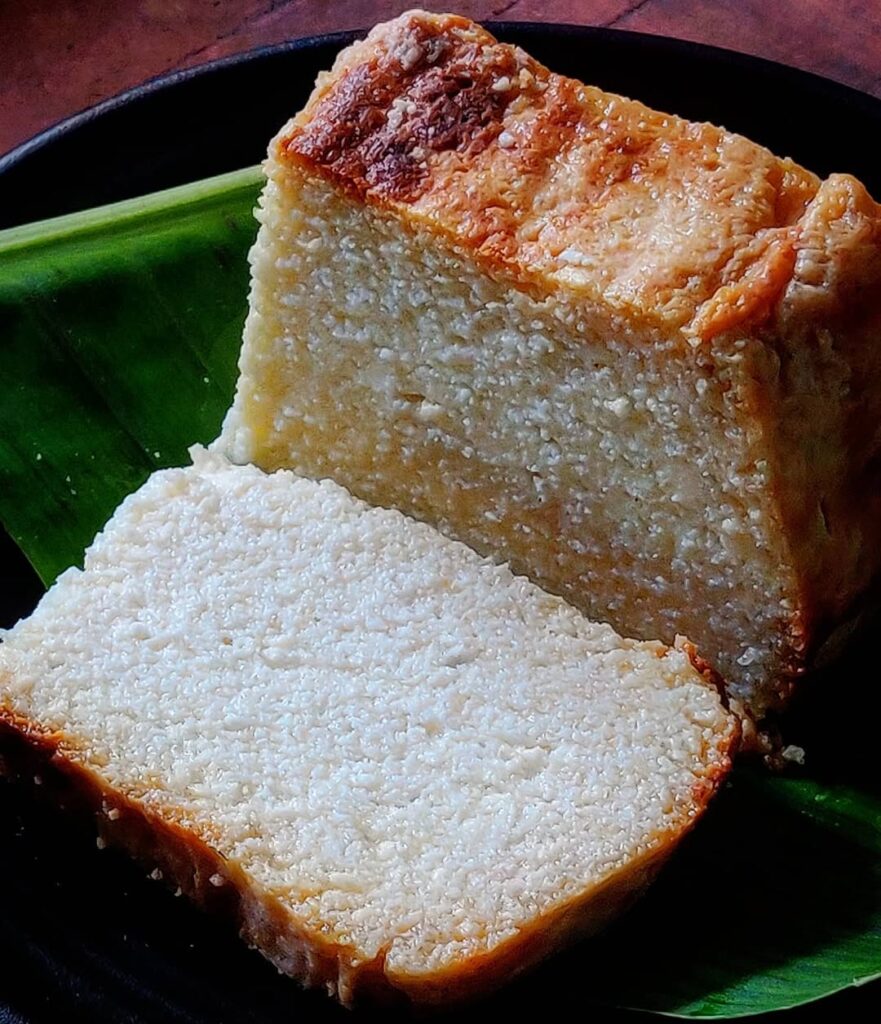
Imagine biting into a dessert with a crisp, caramelized shell that cracks just right. Inside, you find a soft, moist center packed with sweet, milky notes. This is Chhena Poda, the burnt cheese delight that hooks you from the first taste. No other Indian sweet matches its unique blend of textures and flavors. It stands out from creamy rasgullas or dense gulab jamuns.

Chhena Poda holds a special spot as Odisha’s national dessert. People serve it at festivals like Rath Yatra and family gatherings. Its roots run deep in the state’s culture, where it brings joy to every bite. This guide dives into its history, how to make it, and tips for success. You’ll learn to create an authentic version at home that rivals any shop in Puri.

The Legacy and Origin of Chhena Poda

A Taste of Odisha’s Culinary Heritage

Chhena Poda traces back to Odisha’s villages. Local tales say a confectioner named Sura Bej left leftover chhena in an earthen pot near a fire one night. By morning, the mix had baked into a golden treat. That happy accident birthed this Odisha famous sweet. Now, it graces plates across India and beyond.

Folks link it to ancient temple traditions in Jagannath Puri. Priests offered simple milk sweets to gods, and this evolved from there. As an Indian baked cheesecake, it shares traits with Western cheesecakes but skips the oven crust. Its story shows how everyday mishaps spark culinary gems. Bakers still honor that old method today.

Geographical Indication (GI) Status and Regional Variations

Odisha pushes for a GI tag on Chhena Poda to protect its roots. This would lock the name to sweets made with local ingredients, like fresh cow milk from the region. Such tags help crafts like Darjeeling tea stay true. Right now, no official GI exists, but talks continue to safeguard the recipe.

In Puri, they bake it in clay pots for that smoky edge. Cuttack versions add more cardamom for spice. Modern twists pop up in cities, with vegan options using tofu. Yet, purists stick to traditional styles. These differences highlight how one dish adapts while keeping its core.

The Science of the Star Ingredient: Chhena

Understanding Fresh Paneer vs. Chhena

Chhena is the heart of this dessert, not your average paneer. Store paneer stays firm and block-like, great for curries. Chhena, though, crumbles soft from fresh milk curds. It needs that light touch to hold moisture without turning tough.

You make chhena by heating milk and adding lemon juice or vinegar. The acid splits the milk into curds and whey. Strain it gently, and you get the fluffy base. Skip store-bought; fresh yields better results. This step sets your Chhena Poda apart from bland copies.

Achieving the Ideal Moisture Content

Drain chhena well, but don’t squeeze too hard. Wet chhena makes a soggy base that steams instead of bakes. Dry chhena turns grainy, like overcooked rice. Aim for a balance where it holds shape yet feels damp.

Hang it in a cloth for 30 minutes to let whey drip out. Press lightly if needed. For how to drain chhena for sweets, test by squeezing a bit – a few drops should come, not a flood. This trick ensures even baking and smooth texture.

Step-by-Step Mastery: Crafting Perfect Chhena Poda

Ingredient Ratios and Caramelization Secrets

Start with 500 grams of fresh chhena. Mix in 200 grams of sugar or jaggery for that deep flavor. Add two tablespoons of ghee to bind it, plus a teaspoon of cardamom powder. Some recipes toss in semolina for extra chew.

Jaggery gives a rustic taste and darker crust than white sugar. It caramelizes slow, building that signature burnt top. A top Odia chef once shared the key ratio: one part sugar to two and a half parts chhena. This keeps sweetness in check without overwhelming the milk notes. Mash the mix by hand for even spread.

  • Fresh chhena: 500g
  • Sugar or jaggery: 200g
  • Ghee: 2 tbsp
  • Cardamom: 1 tsp
  • Optional: 1 tbsp semolina

The Baking Technique: Low and Slow is Key

Pack the mix into a greased tin or earthen pot. Dust sugar on top for extra caramel. Bake at 160°C for about an hour. High heat chars the outside fast but leaves the middle raw. Low temps let flavors build slow, like a good stew.

Check at 45 minutes; the top should turn deep brown. If using an oven, place the tin in a water bath for steam. Traditional ways use coal embers for even heat. Patience here pays off in a moist core. Pull it out when a toothpick comes clean from the center.

Cooling and Setting: The Final Transformation

Let it cool in the tin for 10 minutes. Then, chill in the fridge for two hours at least. Heat makes the structure set firm as it cools. Skipping this step leads to a mushy slice that falls apart.

Flavors blend during rest, like marinating meat. The caramel softens just enough. Cut into squares once cold. This wait turns good batter into great dessert.

Troubleshooting Common Chhena Poda Pitfalls

Texture Issues: Grainy or Crumbly Center

A grainy center often comes from over-mixing chhena. Mash gently to avoid breaking curds too fine. Or, you drained it too much, sucking out needed moisture. Next time, check the hang time.

If it’s crumbly, add a touch more ghee or milk. Why is my chhena poda grainy? Usually, it’s old chhena or rushed kneading. Knead 5-7 minutes max. Fresh start fixes most woes.

Crust and Color Control

Pale crust means low sugar or short bake. Boost the top layer of sugar for better char. A burnt top? Pull it early or cover with foil midway. Use a heavy pan to spread heat even.

Home bakers on forums often pick thin tins, leading to burnt edges. Opt for thick ones, like cast iron. This controls color without bitterness. Test your oven spots for hot zones too.

Serving, Pairing, and Modern Presentations

Traditional Presentation and Flavor Enhancers

Serve Chhena Poda at room temp for best taste. Warm it slightly if you like, but cold works for slices. Cardamom adds warmth; nutmeg hints at earthiness in some recipes.

Cut into wedges and dust with powdered sugar. In Odisha homes, it pairs with hot tea. Simple setup lets the flavors shine. No frills needed.

Contemporary Twists and Pairings

Chefs now mix in saffron or nuts for luxury. Serve with vanilla ice cream for cool contrast. Or, top with mango compote in summer. These nods keep it fresh.

Market data shows regional sweets like this up 20% in urban spots. Vegan versions use almond milk chhena. Pair it with black coffee to cut the sweet. Fun ways to enjoy an old favorite.

Discovering the Delight of Chhena Poda: A Timeless Indian Dessert

Welcome to tourmyodisaha.com, where we embark on a culinary journey to explore one of India’s cherished sweet treats—Chhena Poda. This delightful dish originates from Odisha and has captured hearts far beyond its borders. Let’s dive into the rich history, the ingredients, and the process that makes this dessert a true gem of Indian cuisine.

What is Chhena Poda?

Chhena Poda translates to “burnt cheese” in English, referring to the main ingredient used in this delectable treat—chhena, or Indian cottage cheese. Traditionally, Chhena Poda is made by kneading fresh chhena with sugar, semolina, and cardamom. The mixture is then baked until it has a beautiful golden-brown crust, creating a unique and inviting flavor.

The History Behind Chhena Poda

Legend has it that Chhena Poda was accidentally created by a sweet maker in the 1940s who left the chhena in the oven a little too long. Instead of discarding it, he decided to taste it and was pleasantly surprised by the smoky flavor that emerged. Since then, this dessert has become a staple in Odisha, often enjoyed during festivals and special occasions.

Ingredients That Make It Special

Creating a perfect Chhena Poda requires only a few simple ingredients, but the magic lies in their quality. Here’s what you need:

  • Chhena (Cottage Cheese): Freshly made is best for that creamy texture.
  • Sugar: Adjust sweetness according to your taste.
  • Semolina (Sooji): Helps in binding and gives a nice texture.
  • Cardamom Powder: For a fragrant twist.
  • Ghee: Adds richness and aids in baking.

Optional ingredients can include raisins and cashew nuts for added texture and flavor.

Baking the Perfect Chhena Poda

The process of making Chhena Poda is quite simple and rewarding. Here’s a step-by-step guide to help you create this mouth-watering dessert at home:

  1. Prep Your Ingredients: Start by preparing your chhena. If you’re using store-bought chhena, make sure it’s fresh.
  2. Mix Ingredients: In a bowl, combine the chhena, sugar, semolina, cardamom powder, and ghee. Mix until you have a smooth consistency.
  3. Add Extras: Incorporate raisins or cashew nuts if you’re using them.
  4. Bake: Preheat your oven to 180°C (350°F). Transfer the mixture into a greased baking dish and bake for about 45-50 minutes, or until the top is golden brown.
  5. Cool and Serve: Let it cool for a bit before slicing. Chhena Poda can be enjoyed warm or at room temperature, making it a flexible dessert choice.

Why You Should Try Chhena Poda

Not only does Chhena Poda illustrate the simplicity of traditional Indian sweets, but it also offers a delightful blend of flavors that harmonizes perfectly with its rich, creamy texture. It’s a dessert that celebrates the essence of home-cooked meals and the joy of sharing good food with loved ones.

Whether you’re looking to satisfy a sweet tooth or impress your guests at your next gathering, Chhena Poda is sure to be a crowd-pleaser.

Join us on our journey through the world of Indian cuisine! For more delicious recipes and tips, stay tuned to tourmyodisaha.com.

Happy cooking and tasting!

Conclusion: Savoring the Taste of Odisha

High-quality, well-drained chhena makes all the difference in Chhena Poda. It builds the base for that perfect bite. Fresh prep beats store stuff every time.

Slow baking demands patience, but it crafts the magic. Rush it, and you miss the caramel soul. Take your time for pro results.

Try this recipe soon. Bake up a batch and taste Odisha at home. Share your pics or tweaks – it’s easier than you think.

Discovering the Sweet Delights of Rasgulla

Discovering the Sweet Delights of Rasgulla

When it comes to desserts, few can rival the charm and sweetness of Rasgulla. This iconic Indian sweet has captured the hearts of many, and for good reason! Today, let’s take a closer look at this delectable treat and explore what makes it a must-try for anyone with a sweet tooth.

What is Rasgulla?

Rasgulla, a soft and spongy ball made from chhena (Indian cottage cheese), is soaked in a light sugar syrup. Believed to have originated in the state of West Bengal, this dessert has become popular across India and in various other parts of the world. The texture of Rasgulla is what sets it apart – the spongy, melt-in-your-mouth experience is simply unparalleled.

A Brief History

The roots of Rasgulla can be traced back to the 19th century, with claims of its creation by the famous Bengali sweet maker, Nobin Chandra Das. The sweet has deep cultural significance and is often associated with celebrations, festivals, and religious occasions. Every bite of Rasgulla tells a story, transporting you to the bustling streets of Kolkata, where sweet shops thrive with this beloved treat.

How is Rasgulla Made?

The process of making Rasgulla is a labor of love. Fresh milk is boiled, curdled, and then the chhena is drained, rinsed, and kneaded until smooth. The dough is carefully shaped into small balls and boiled in a sugar syrup, where it absorbs the sweetness and expands to become the delightful treat we all know and love. It’s truly fascinating to see how a few basic ingredients can transform into such a cherished dessert!

Where to Find the Best Rasgulla

If you’re eager to try authentic Rasgulla, make sure to check out local sweet shops, especially in West Bengal. However, many places outside of India also serve delicious versions of this sweet. Look for establishments that specialize in Indian desserts for the best experience. You can also explore recipes online to bring the joy of Rasgulla into your own kitchen.

The Ultimate Guide to Rasgulla: Discovering the Sweet Delights of India’s Iconic Spongy Dessert

Imagine biting into a soft, juicy ball that melts in your mouth, soaking up sweet syrup with every chew. That’s Rasgulla for you—a simple yet magical treat from India. This spongy delight has won hearts for generations, turning ordinary moments into sweet celebrations.

Introduction: The Quintessential Indian Sweet

Rasgulla stands out as one of India’s most loved desserts. It comes from the eastern parts of the country, mainly Odisha and West Bengal. People enjoy it during festivals like Durga Puja or just as a daily pick-me-up.

A Brief History and Cultural Significance

Rasgulla dates back over a century. Folks in Odisha claim it started there in the 19th century, thanks to a chef named Nabin Das. In West Bengal, it’s tied to Kolkata’s sweet shops, where it became a staple.

This sweet plays a big role in Indian culture. At weddings and pujas, families serve Rasgulla to share joy. It symbolizes sweetness in life, much like how it soaks up syrup. Even today, street vendors sell fresh batches, drawing crowds after meals.

What Makes Rasgulla Unique?

The magic lies in its texture—light and spongy, not dense like other sweets. You make it from fresh chenna, which is curdled milk cheese, and dunk it in sugar syrup. This combo gives a burst of sweetness without being too heavy.

Unlike gulab jamun, Rasgulla floats in syrup, absorbing just enough to stay soft. Its white color and round shape make it look pure and inviting. Once you try one, you’ll see why it hooks people fast.

The Alchemy of Making Rasgulla: From Milk to Magic

Turning milk into Rasgulla feels like kitchen wizardry. You start with basic items, but skill makes all the difference. Follow these steps, and you’ll create your own batch.

The Crucial First Step: Perfecting Chenna (Paneer)

Begin by boiling full-fat milk. Add lemon juice or vinegar to curdle it—watch the whey separate. Strain the curds through a cheesecloth, then rinse with cold water to remove any sour taste.

The chenna must feel soft and smooth, like fresh dough. Knead it for 5-10 minutes until it stops cracking. If it’s grainy, your Rasgulla won’t puff up right. Good chenna is the base for that perfect sponge.

Shaping and Boiling: The Art of the Sphere

Divide the kneaded chenna into small balls, about the size of a walnut. Roll them gently to avoid cracks. Drop them into boiling water for a quick blanch—this sets the shape.

Now comes the fun part: simmer the balls in sugar syrup. Use a wide pot to let them expand. Boil for 15-20 minutes on medium heat. They’ll double in size, turning airy inside. Let them cool in the syrup to soak up flavor.

  • Tip 1: Add a pinch of cardamom to the dough for subtle aroma.
  • Tip 2: Don’t overcrowd the pot, or balls might stick.
  • Tip 3: Test one ball—if it springs back, it’s ready.

Variations in the Syrup Consistency

Syrup matters a lot in Rasgulla making. For a light soak, use a thin solution with one part sugar to two parts water. Boil it briefly so the balls stay juicy but not soggy.

In some areas, folks prefer thicker syrup for a chewier bite. West Bengal styles often go denser, while Odisha keeps it lighter. Adjust based on taste—start thin if you’re new. This tweak changes the whole experience.

Regional Rivalry and Heritage: The Battle for Authentication

Rasgulla sparks friendly debates across India. Both Odisha and West Bengal claim it as their own. This rivalry highlights its deep roots in local pride.

The Geographical Origins Debate: Odisha vs. West Bengal

Odisha says Rasgulla began in Puri temples around 600 years ago, offered to Lord Jagannath. Historical texts mention a similar sweet there. West Bengal points to 1868, when Nobin Moitra sold it in Kolkata.

The argument heats up during festivals. Odisha celebrates Rasagola Dibasa on July 30. Bengal counters with its own claims in sweet shop lore. Both sides agree it’s a treasure, though.

Geographical Indication (GI) Tag Status

In 2017, Odisha got a GI tag for “Odisha Rasagola.” This protects its traditional recipe and method. West Bengal followed in 2019 with “Banglar Rasogolla,” covering their version.

GI tags help preserve recipes and boost local sellers. They stop fake copies from cheapening the name. Now, tourists seek authentic spots, supporting small businesses. It’s a win for culture and economy.

Modern Interpretations and Global Spread

Rasgulla has gone worldwide, popping up in Indian stores abroad. In the US and UK, brands like Bikanervala sell canned versions. Fusion twists include chocolate-coated ones or pistachio fillings.

Back home, chefs experiment with rose syrup or mango essence. These keep the classic alive while adding flair. Next time you travel, spot Rasgulla on menus—it’s India’s sweet ambassador.

The Science Behind the Sponge: Texture and Taste

Ever wonder why Rasgulla feels like a cloud? It’s not just luck—science plays a key role. Heat and ingredients team up for that signature bounce.

Understanding Porosity: Why Rasgulla is Spongy

When you boil chenna balls in syrup, steam builds inside. This creates tiny air pockets, making the structure porous. The balls expand as water turns to vapor, then absorb syrup as they cool.

Without this step, they’d stay flat and tough. Kneading releases proteins that trap air. It’s like baking bread, but sweeter and faster. That porosity lets flavor seep deep.

The Role of Sugar Concentration in Syrup

Sugar levels affect how syrup works. A 30-40% solution draws liquid into the ball by osmosis. Too high, and it shrinks the chenna—think tough rubber.

Aim for balance: dissolve sugar fully before boiling. This keeps balls intact and sweet. Test with a hydrometer if you’re precise, but taste works too. Get it right, and you’ll nail the texture every time.

Serving Suggestions and Temperature Best Practices

Serve Rasgulla chilled for a refreshing hit, especially in summer. Room temp works for cozy evenings. Warm ones shine during winters, straight from the pot.

Pair with rabri, a thick milk sauce, for extra creaminess. Or drop into kheer for a pudding twist. Here’s how to serve:

  1. Chill in fridge for 2 hours post-cooking.
  2. Garnish with slivers of pistachio.
  3. Enjoy 2-3 per person to savor without overload.

Avoid microwaving— it makes them watery.

Beyond the Basics: Exploring Rasgulla Varieties

Rasgulla isn’t one-note. Cooks tweak it for fun flavors and diets. Dive into these options to mix things up.

Brown Rasgulla (Kala Jamun/Pantua Precursors)

Brown Rasgulla, or kala jamun, gets its color from longer frying. Add semolina to chenna for a denser feel. It bridges Rasgulla and gulab jamun, with a caramel edge.

In Bengal, Pantua is similar—fried then soaked. Try it for festivals; the crunch outside surprises. It’s heartier than white versions but still syrupy sweet.

Flavored Syrups and Natural Infusions

Jazz up syrup with cardamom pods for earthy warmth. Rose water adds floral notes, perfect for romance. Kewra essence brings a nutty twist, common in Lucknow sweets.

  • Cardamom: Boil 4-5 pods in syrup.
  • Rose: 1 tsp per cup of liquid.
  • Fruit: Infuse with saffron strands for golden hue.

These change the profile without much work. Pick based on mood—spicy or subtle.

The Rise of Low-Sugar and Healthier Alternatives

Health trends push low-sugar Rasgulla. Use stevia or jaggery instead of white sugar. Low-fat milk works, but expect less richness.

Market stats show a 20% rise in sugar-free sweets in India last year. Recipes online swap full cream for toned milk. They’re lighter, great for diabetics. Taste tests prove they still satisfy cravings.

Conclusion: A Timeless Sweet Experience

Key Takeaways on Mastering and Appreciating Rasgulla

Master Rasgulla with quality chenna and careful boiling. Shape balls smooth, boil just right for sponge magic. Embrace its history—from Odisha temples to Bengal streets.

Value the GI tags that guard traditions. Experiment with flavors to make it yours. Serve chilled or warm, paired simply, for best joy.

Final Thought: Why Rasgulla Endures

Rasgulla lasts because it’s pure bliss in a bite. No frills, just soft sweetness that unites people. Next time you crave dessert, grab one—it’s India’s gift that keeps giving. Why not try making your own today?

Join the Rasgulla Revolution!

If you haven’t tried Rasgulla yet, now is the perfect time to indulge in this sweet delight. Whether you’re enjoying it after a hearty meal or savoring it on its own, Rasgulla offers a unique taste of Indian culture and tradition.

For more mouthwatering desserts and travel inspiration, be sure to visit [tourmyodisaha.com]. Share your Rasgulla stories and favorite places with us in the comments below!


Whether you’re a seasoned sweet-lover or a newcomer to Rasgulla, it’s a dessert that promises to satisfy and delight. Go ahead and treat yourself – you won’t regret it!